Setup Vipps MobilePay for Gravity Forms
As the leading Nordic mobile payments provider, being able to select Vipps/MobilePay as payment method is something customers today nearly expect to find online. No long card numbers and bank authentication codes to deal with, just a phone number and a quick tap on the notification that pops up on their phone. The WordPress plugin Vipps MobilePay for Gravity Forms adds support for this in Gravity Forms, and opens up a whole range of opportunities for effortless payments online. Donations and simple online shops are just a few examples of where Gravity Forms can be combined with Vipps or MobilePay to increase conversion.
Start by downloading Vipps MobilePay for Gravity Forms and uploading the plugin to your WordPress site.
Get API keys from Vipps MobilePay
Go to https://portal.vippsmobilepay.com and log in.
If you do not have an agreement with Vipps MobilePay already, place an order at https://vippsmobilepay.com/no/betalt-paa-nett/integrert-betaling if you wish to accept single payments, and https://vippsmobilepay.com/no/betalt-paa-nett/fakturering-faste-betalinger for subscriptions.
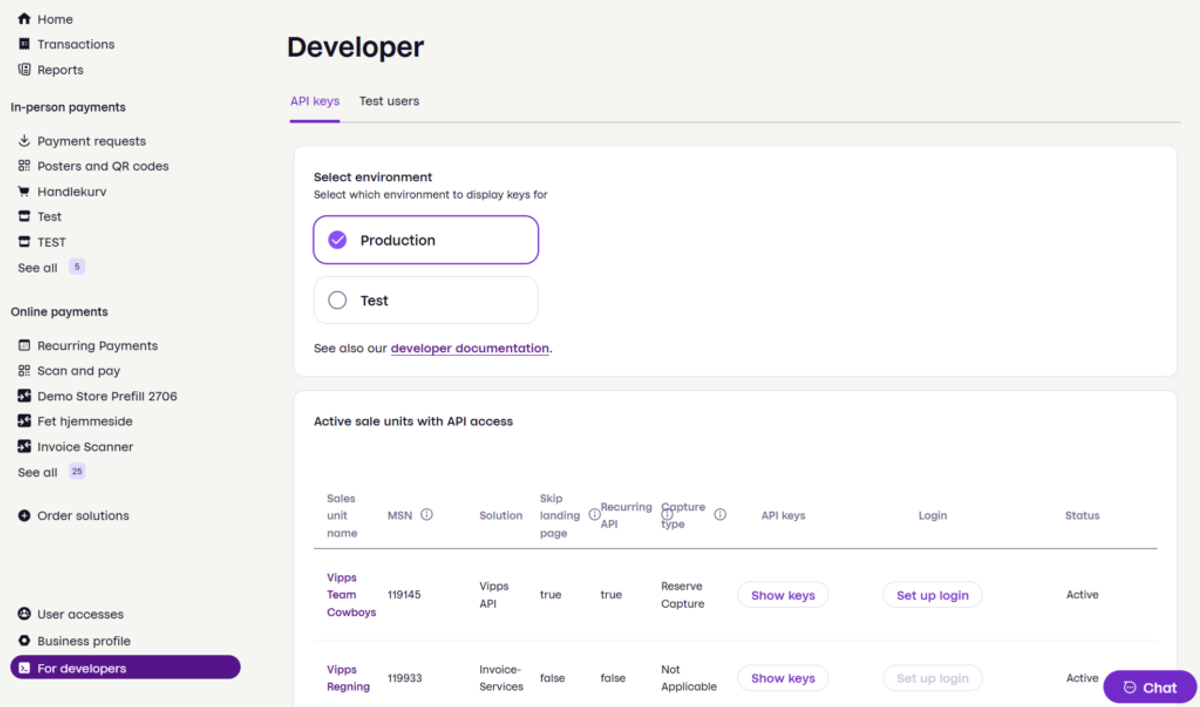
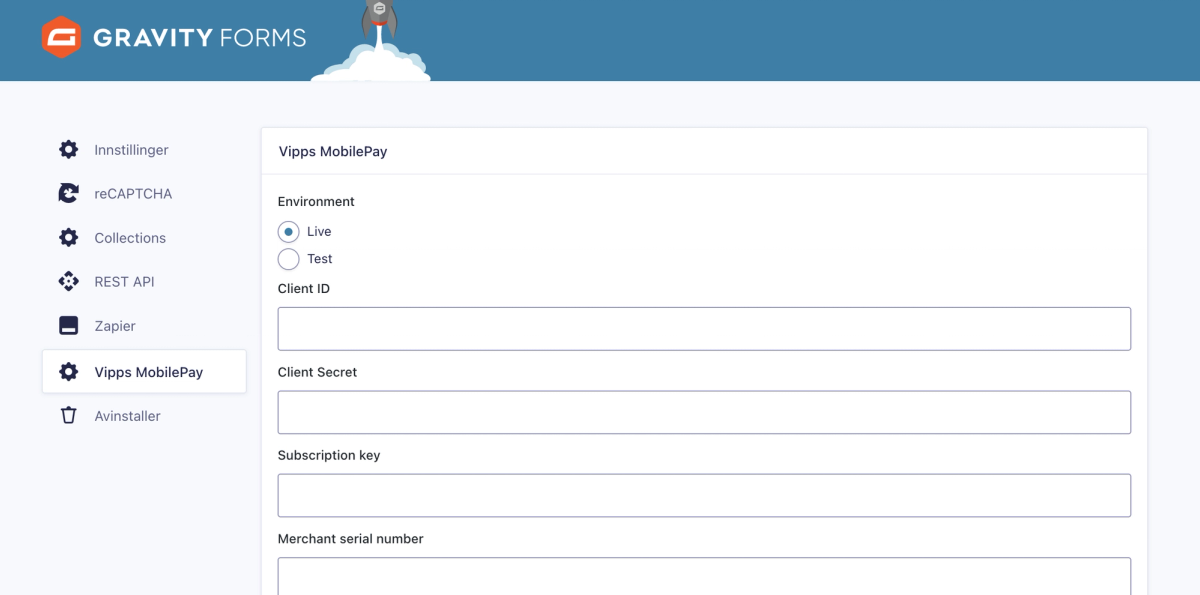
Select "For developers" in the sidebar. With the API keys tab selected, you should see a table with sales units. Unless you are a developer testing with the Merchant Test apps, use the keys for the "Production" environment.
Find your sales unit in the table and make note of the MSN column, this is needed in the plugin settings. You may then click on "Show keys". Copy the keys to the corresponding plugin settings field.
To receive updates for the Vipps MobilePay plugin, enter the licence key you received by email upon purchasing.
Configuring your form
If you have not used payments with Gravity Forms before, then there are a few things to keep in mind. The special fields we'll be using come built-in with Gravity Forms in the "Add fields" tab.
Product fields
A product field that with a price must be added, and you can combine multiple fields of this type and together with conditional logic to create more advanced forms.
Total
A field for the total sum can be added if you have several product lines in your field, and is often added at the very end of the form to give the user a final glance of what they will pay before submitting the form. The sum in this form is automatically calculated based on the product fields we added previously.
Payment method selection
In cases where you have other payment providers (such as Stripe) or are combining multiple Vipps MobilePay feeds, we recommend setting up checkboxes with options for each payment method. Each feed can then be configured using "conditional logic" at the very bottom of the feed settings to only run whenever the correct payment method is selected.
REST API access
Please note that if you have restricted the WordPress REST API, the route /wp-json/gfvipps/redirect/<entry_id> has to be publically accessible for redirects to work.
Setting up the Vipps MobilePay feed
When all fields are added, head to the form settings and select "Vipps MobilePay" on the left hand side. Here we will create a "feed" where all form submissions will go through. If you have previously used Stripe or PayPal with Gravity Forms, this step should be familiar.
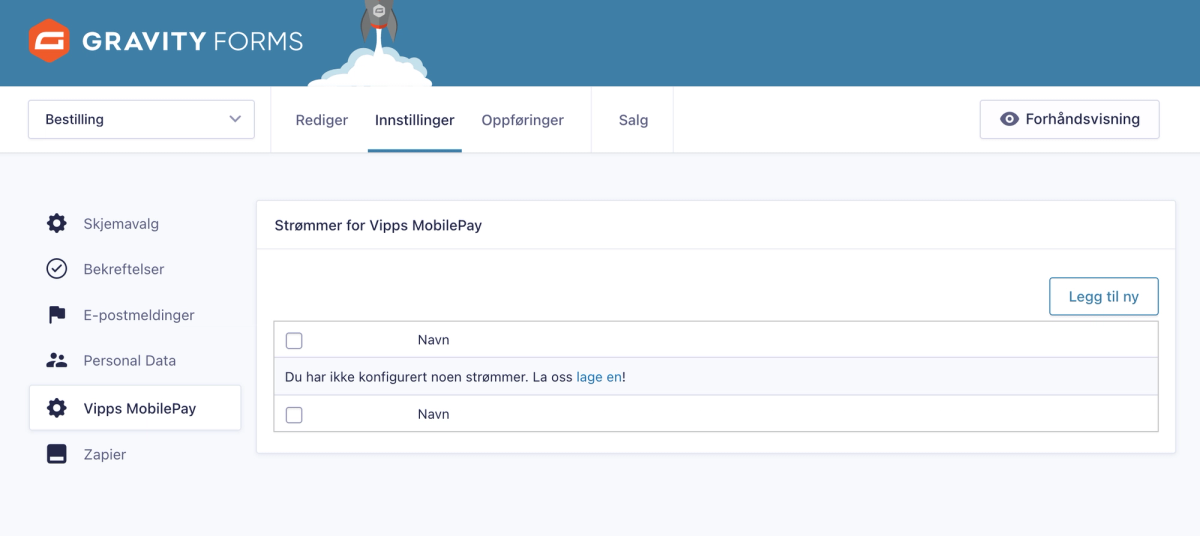
You may create several Vipps MobilePay feeds on one form, and we do actually recommend it if you are using Vipps MobilePay as the sole payment provider. Not everyone has the payment app installed on their phone, and offering card payments can therefore be a good alternative that doesn't involve any extra configuration apart from setting up the feed in Gravity Forms. You may be running a donation form, and in this case setting up a feed for one-time payments and another for recurring payments may be useful.
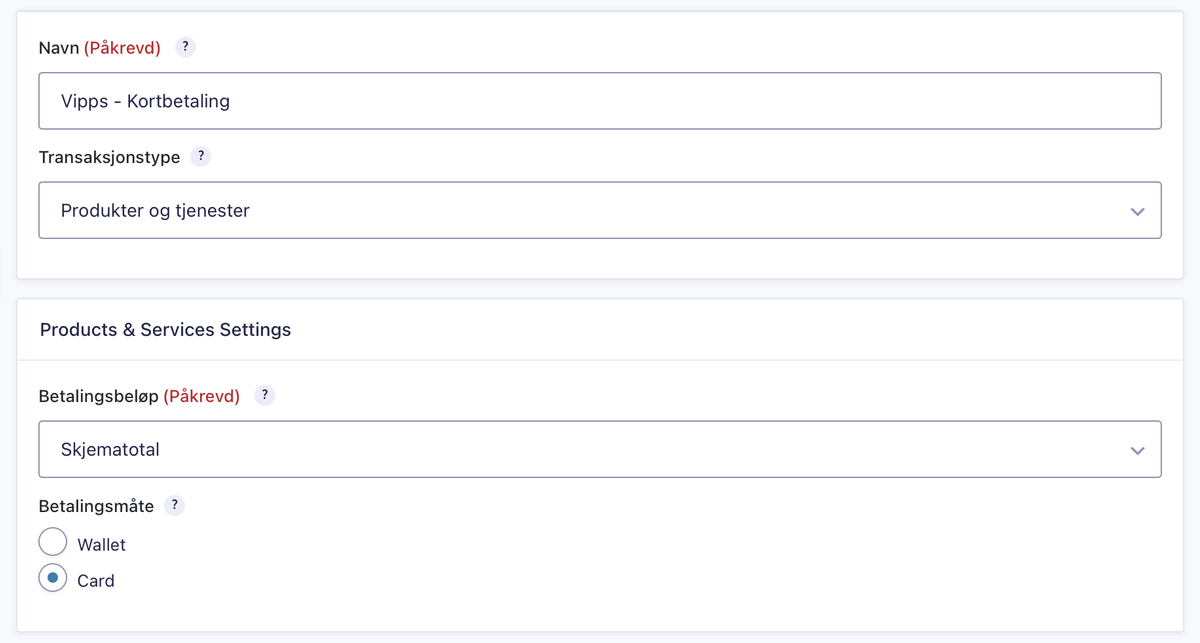
Add a new feed and select either "products and services" for one-time payments or "subscription" for recurring payments. See the sections below to type-specific info.
Single payments
The "payment method" field for single-payment feeds allows you to create feeds for app-based payments (wallet option) and freestanding card payments (card option). If you would like both options, simply create two feeds and use conditional logic to trigger the correct one upon submission.
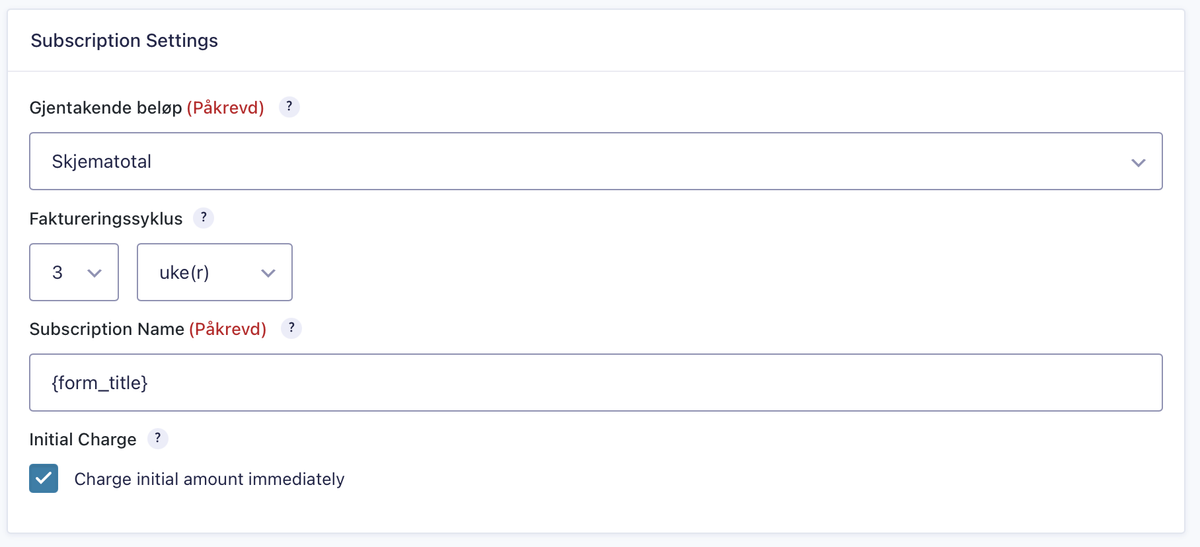
Subscriptions
Setting the transaction type to handle subscriptions presents you with a couple of different options.
Billing cycle
The frequency of how often the customer will be charged for the subscription.
Initial charge
Whether to charge the customer immediately, or wait with the first charge until the next billing cycle. If selected, the amount will be reserved immediately and captured automatically next night at around 02/03 AM.
Subscription name
The subscription name displayed to the user in the app. You may use regular plain text or merge tags.
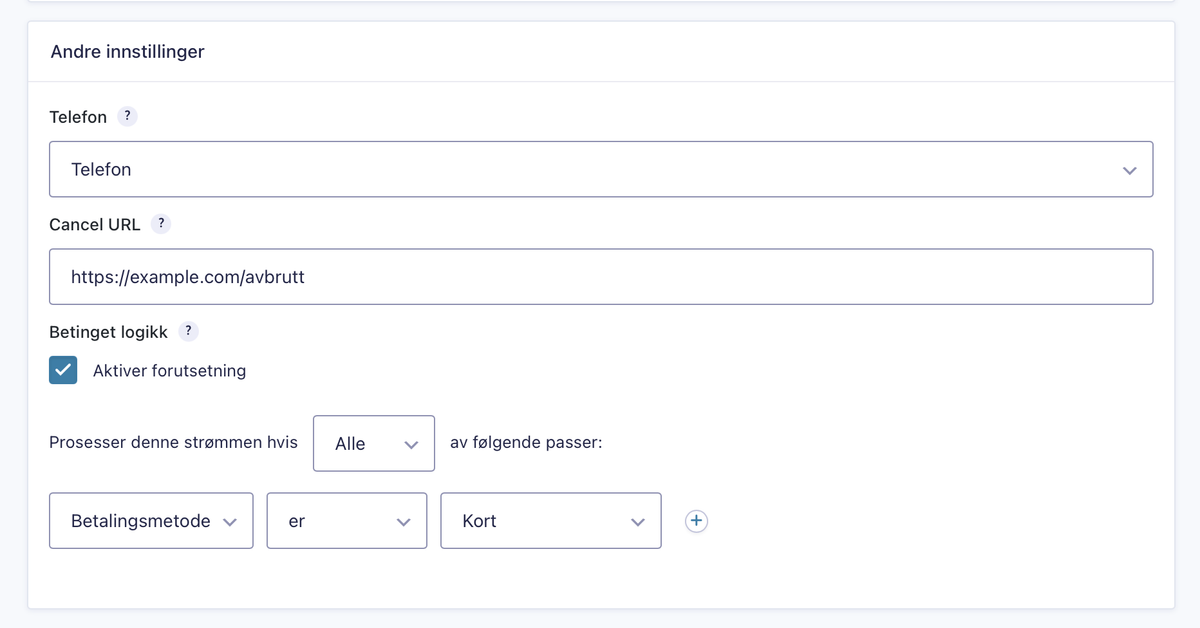
Other settings
The final section of the feed settings allows you to define the phone field that autofills in the payment portal, define the cancel URL and configure conditional logic.
In cases where the user cancels the payment process from the app or portal or an error occurs, you may wish to redirect them to a dedicated page for this.
Confirmations
Pages and redirects
Due to the way Vipps MobilePay sends the user to an external payment portal, all confirmations for the form must either be set to "page" or "redirect". Create a dedicated page for successful pages that make it clear to the user that the payment has gone through.
E-mail notifications
By default, e-mail notifications in Gravity Forms are set to be sent immediately after form submission, but due to the payment flow with Vipps MobilePay where the user has to complete the payment in the app, e-mail notifications should be set up to be sent upon a payment or subscription related event.
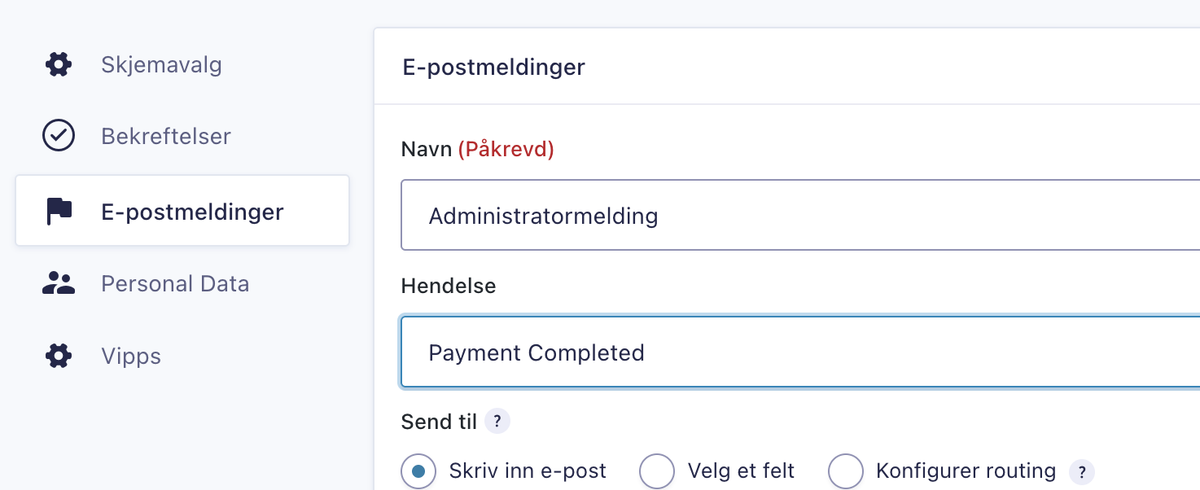
It is also recommended to use the e-mail confirmation as a payment receipt, as Vipps MobilePay will not send out one separately. Below is an example that includes the transaction ID, payment date and amount which is automatically populated by the merge tags used.
Transaction ID: {entry:transaction_id}
Date: {entry:payment_date}
Amount: {entry:payment_amount} {entry:currency}
Make sure to also include the customer info as well as your business name, registration number and address for legal compliance.